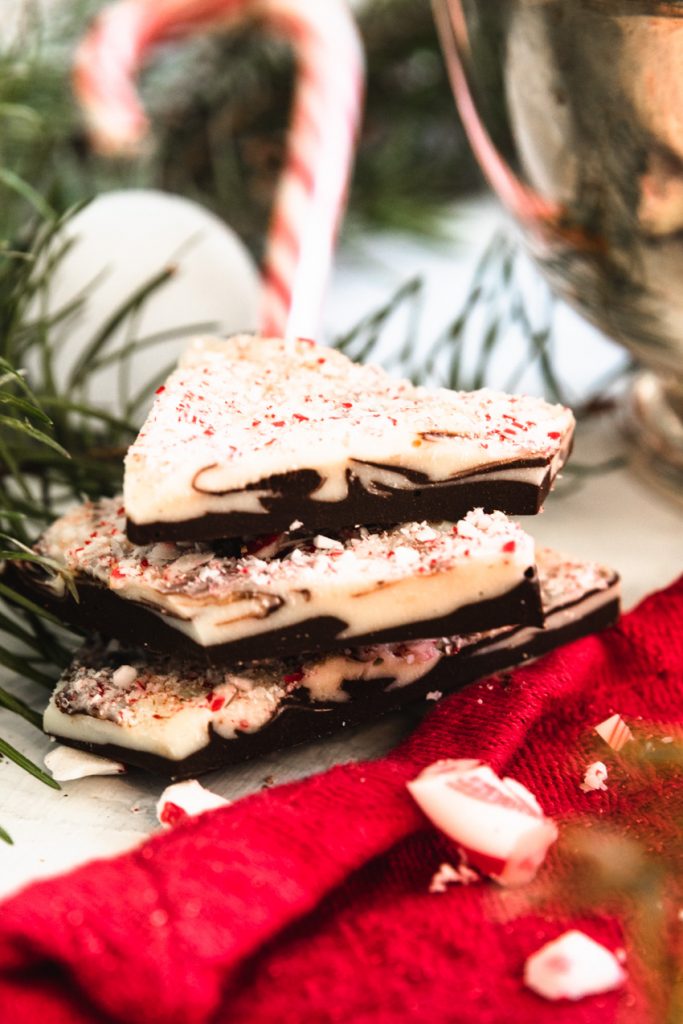
Want to try your hand at making your own easy peppermint bark? Here are two different ways to make this simple holiday treat!
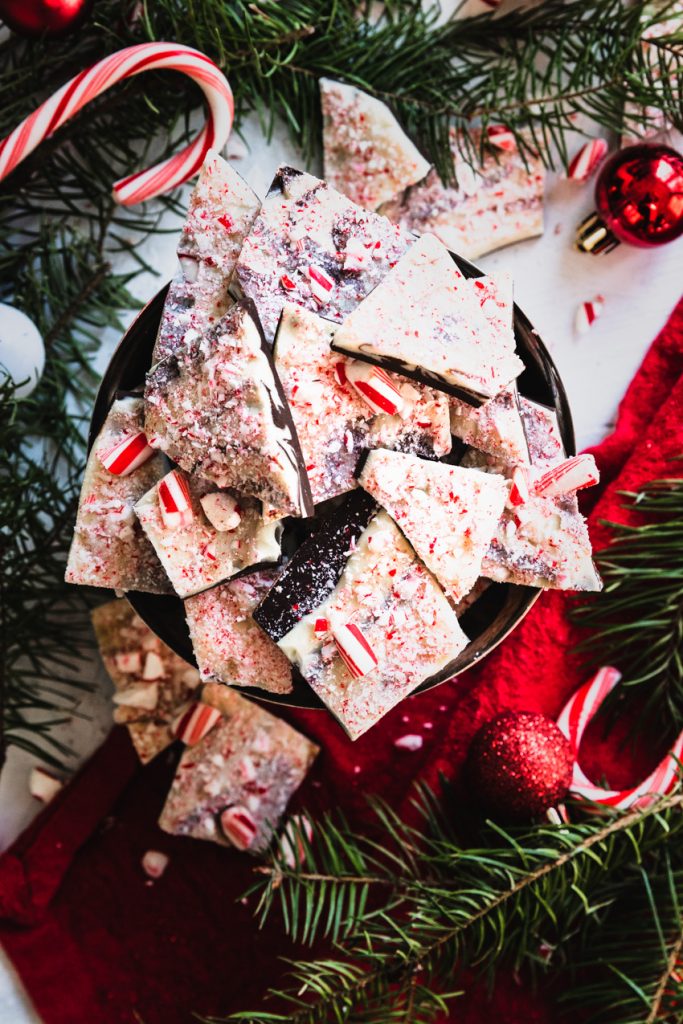
I make it no secret: Peppermint Bark is by far my favorite Christmas sweet. The classic flavor combo, the vividly appealing look of it, the festive nature of it all... peppermint bark really has it all.
And this post and recipe will show you exactly how to make this deliciousness at home with any kind of chocolate you may have on hand and with several different methods. Merry, merry Christmas indeed.

What is the Best Kind of Chocolate for Peppermint Bark?
You can buy several different kinds of chocolate, so which one is the best for peppermint bark? There are chocolate bars, chocolate melting wafers, or chocolate chips, and they're all great options! I'm breaking down the different kinds of chocolate into pros and cons lists so you can easily decide which is the best option for you.
Chocolate Bars (My preferred chocolate)
Pros
Cons
- Real chocolate bars will give you the best flavor and quality peppermint bark.
- The peppermint oil flavoring used for this kind of chocolate also has a much cleaner, purer taste than peppermint extract.
- It's easy to find! Any grocery store will have a selection for you to choose from. Trader Joe's Pound Plus Bars are what I used for this recipe, and they are very high quality and affordable.
- You can choose your flavor! If you're a dark chocolate person, go for a 70% (my favorite) or darker. Or if you want your peppermint bark a little sweeter, you can use milk chocolate as well!
- Real chocolate can be tempermental to work with. Water, steam, or overheating can cause it to become lumpy, grainy, and inedible.
- You will need an oil based peppermint flavoring. The water content in peppermint extract will cause seizing (the lumpy graininess mentioned above).
- While I don't temper my chocolate (heat it to a particular temperature to get optimal shine and snap), if you want to do this it can be a tricky process.
Note: Chocolate Chips have pretty much the same pros/cons list as chocolate bars, with one significant added con. The wax content of chocolate chips is much higher to help them hold their shape while baking. If you use chocolate chips, your peppermint bark will still taste great, it just may have a slightly waxier flavor and feel and a less intense chocolate flavor.
Ghirardelli Chocolate Melting Wafers
Pros
Cons
- Easy to melt in the microwave without burning due to chocolate's usual cocoa butter being replaced by palm oil.
- Has a nice, shiny appearance and snap without having to fuss with chocolate temperatures.
- You can use peppermint extract without the chocolate seizing (becoming grainy and lumpy) from the water content.
- Has a bit of a waxy flavor.
- May be more difficult to find in stores.
- Avoid any candy melts other than Ghirardelli. This post is not sponsored, the other brands just have little to no actual chocolate in them and a very lackluster flavor.

Ingredients for Easy Peppermint Bark
For the Chocolate Melting Wafers:
- A 10 oz. bag of dark chocolate candy melt (also available at most grocery stores)
- 10 oz. bag of white chocolate candy melts (also available at most grocery stores)
- Peppermint extract
- 6-8 candy canes-- unwrap the candy canes, place them in a zippered bag, and smash with a wooden rolling pin or mallet.
For the Chocolate Bars or Chips:
- 12 oz. Dark Chocolate--I prefer chopped dark chocolate bar, but you can also use chocolate chips
- 12 oz. White Chocolate--again, chopping up bars is my preference, but chips are fine too! Also, make sure your white chocolate isn't old, as it won't melt down and be smooth.
- Oil-based peppermint flavoring--you can order it here, or find it at most craft or baking stores. If there is any alcohol or water in your flavoring, it will likely cause your chocolate to seize. See the Recipe Tips and Notes section for more information.
- 6-8 candy canes-- unwrap the candy canes, place them in a zippered bag, and smash with a wooden rolling pin or mallet.

How to Make Peppermint Bark with an Instant Pot
- Pour about an inch of water into the bottom of your Instant Pot and push the Sauté button. Any size Instant Pot will work.
- Put a sheet of parchment paper on a large baking sheet and set it close by.
- Place your chopped dark chocolate inside a heat-proof bowl (glass or metal is best) that is large enough to sit on top of your Instant Pot.
- When the water is simmering, place the bowl of chocolate over it. Using a plastic spatula, stir the chocolate occasionally as it melts.
- Add in the peppermint extract or flavoring (depending on if you're using chocolate melts or real chocolate) and stir it thoroughly into the melted chocolate.
- Once the dark chocolate is completely melted, pour it out onto the parchment-lined baking sheet and spread it into an even layer. Don't spread it too thin, as it will just shatter when you try to break it into pieces. Allow the dark chocolate to harden at room temperature.
- Clean out the bowl and melt down the white chocolate over the Instant Pot.
- Spread the white chocolate over the dark in an even layer and immediately sprinkle it with the crushed candy canes.
- Allow the white chocolate to harden completely, then break the peppermint bark into pieces. Store it in a bag or airtight container in a dark, cool place.
How to Make Peppermint Bark with on the Stove Top
- Pour about an inch of water into the bottom of a medium-sized pot. Set it over medium-low heat and bring it to a simmer.
- Put a sheet of parchment paper on a large baking sheet and set it close by.
- Place your chopped dark chocolate inside a heat-proof bowl (glass or metal is best) that is large enough to sit on top of your pot of water.
- When the water is simmering, place the bowl of chocolate over it. Using a plastic spatula, stir the chocolate occasionally as it melts.
- Add in the peppermint extract or flavoring (depending on if you're using chocolate melts or real chocolate) and stir it thoroughly into the melted chocolate.
- Once the dark chocolate is completely melted, pour it out onto the parchment-lined baking sheet and spread it into an even layer. Don't spread it too thin, as it will just shatter when you try to break it into pieces. Allow the dark chocolate to harden at room temperature.
- Clean out the bowl and melt down the white chocolate over the pot of simmering water.
- Spread the white chocolate over the dark in an even layer and immediately sprinkle it with the crushed candy canes.
- Allow the white chocolate to harden completely, then break the peppermint bark into pieces. Store it in a bag or airtight container in a dark, cool place.
How to Make Peppermint Bark in the Microwave
- Put a sheet of parchment paper on a large baking sheet and set it close by.
- Place your chopped dark chocolate or chocolate melts in a microwave safe bowl (glass is best).
- Microwave the chocolate for 30 seconds, then remove from the microwave and stir it. Microwave for another 15 seconds, then stir again. Continue to do this until the chocolate is completely melted.
- Add in the peppermint extract or flavoring (depending on if you're using chocolate melts or real chocolate) and stir it thoroughly into the melted chocolate.
- Once the dark chocolate is completely melted, pour it out onto the parchment-lined baking sheet and spread it into an even layer. Don't spread it too thin, as it will just shatter when you try to break it into pieces. Allow the dark chocolate to harden at room temperature.
- Clean out the bowl and melt down the white chocolate, making sure to stop and stir the chocolate every 15 seconds.
- When it's completely melted, spread the white chocolate over the dark in an even layer and immediately sprinkle it with the crushed candy canes.
- Allow the white chocolate to harden completely, then break the peppermint bark into pieces. Store it in a bag or airtight container in a dark, cool place.
Recipe Notes & Tips:
- Whichever method you choose, choose a high quality chocolate for the best results
- If you want your peppermint bark to be a little bit swirly, like in these pictures, add the white chocolate layer after the dark chocolate layer has just set. Drizzle the white chocolate over the dark, then carefully spread it with the back of the spoon. Don't over mix, as too much mixing will just make the layers look muddy.
- For completely even layers with no chocolate mixing, allow the dark chocolate to set completely before melting and adding the white chocolate layer.
- You can choose the thickness of the layers. Try to avoid very thick layers, which will make it hard to eat, or very thin layers, which will shatter easily.
- Gently press larger pieces of candy cane into the white chocolate layer to keep them from falling off.
Other Holiday Recipes:


Easy Peppermint Bark
- Total Time: 1 hr. 20 minutes
- Yield: 1 lb. 4 oz. peppermint bark 1x
Description
Want to try your hand at making your own easy peppermint bark? Here are two different ways to make this simple holiday treat!
Ingredients
- 10 oz. dark chocolate or chocolate melting wafers
- 10 oz. white chocolate or chocolate melting wafers
- ½ tsp. peppermint oil or 1-1 ½ tsp. peppermint extract
- 6-8 candy canes, crushed
Instructions
Pour about an inch of water into the bottom of a medium-sized pot. Set it over medium-low heat and bring it to a simmer.
Put a sheet of parchment paper on a large baking sheet and set it close by.
Place your chopped dark chocolate inside a heat-proof bowl (glass or metal is best) that is large enough to sit on top of your pot of water.
When the water is simmering, place the bowl of chocolate over it. Using a plastic spatula, stir the chocolate occasionally as it melts.
Add in the peppermint extract or flavoring (depending on if you're using chocolate melts or real chocolate) and stir it thoroughly into the melted chocolate.
Once the dark chocolate is completely melted, pour it out onto the parchment-lined baking sheet and spread it into an even layer. Don't spread it too thin, as it will just shatter when you try to break it into pieces. Allow the dark chocolate to harden at room temperature.
Clean out the bowl and melt down the white chocolate over the pot of simmering water.
Spread the white chocolate over the dark in an even layer and immediately sprinkle it with the crushed candy canes.
Allow the white chocolate to harden completely, then break the peppermint bark into pieces. Store it in a bag or airtight container in a dark, cool place.
Notes
- Whichever method you choose, choose a high quality chocolate for the best results
- If you want your peppermint bark to be a little bit swirly, like in these pictures, add the white chocolate layer after the dark chocolate layer has just set. Drizzle the white chocolate over the dark, then carefully spread it with the back of the spoon. Don't over mix, as too much mixing will just make the layers look muddy.
- For completely even layers with no chocolate mixing, allow the dark chocolate to set completely before melting and adding the white chocolate layer.
- You can choose the thickness of the layers. Try to avoid very thick layers, which will make it hard to eat, or very thin layers, which will shatter easily.
- Gently press larger pieces of candy cane into the white chocolate layer to keep them from falling off.
- Prep Time: 20 minutes, + an hour to set
- Category: Desserts and Sweet
- Method: Melting


One Comment