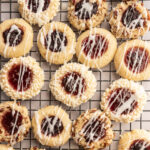
Thumbprint cookies with icing are a classic cookie often found on Christmas cookie plates. Fill the centers with icing, or use your favorite jam then drizzle icing across the tops. You can also add sprinkles or nuts for even more variations on a vintage favorite. This is the best recipe, simple but with plenty of room for creativity!

Cheers to cookie season! Though if you ask me, it's always cookie season. And whether you're baking for the holidays or to satisfy a sweet tooth, thumbprint cookies stand out as a classic cookie that can't do you wrong. And I'm so excited for them to join The Sweetest Season cookie link exchange this year!
The cookie itself is buttery and crumbly, and is based on these classic vanilla sable cookies. It's almost like a shortbread-buttery, rich, and crumbly- but the egg in the mix gives you a sturdier base for the thumbprint filling.
The centers of these cookies are where you can get truly creative. The distinctive thumbprint well in the center can hold a variety of fillings. The frosting for the cookies can be used to fill as well as being drizzled over the top, or you can use jams or fruit curd. You could even try adding a dollop of Nutella in the center--how amazing would that be? My favorite option is jam though--something about it's fruity sweetness with the buttery cookies just works, just like in Linzer cookies.
Note: Here's a recipe for gluten-free thumbprint cookies that will work well if you want to make thumbprint cookies with icing that are GF.
Ingredients

- Granulated Sugar -- The texture of the granulated sugar will work well to rub in the vanilla, creating a frangrant, pervasive vanilla flavor.
- Vanilla Bean or Vanilla Bean Paste -- I opted for vanilla bean paste for these, but you can use either! And in a pinch, vanilla extract works well too, it just doesn't have all of the pretty little bean specks.
- Butter -- I used salted butter for these, but you can use unsalted if that's what you prefer. If you do end up using unsalted, consider adding another ¼ teaspoon of salt to the dough to enhance the flavor.
- Powdered Sugar -- The finer consistency of powdered sugar helps it dissolve into the butter better, and gives you a melt-in-your-mouth consistency.
- Egg Yolk -- Egg yolks are amazing in baked goods for their fat and protein content that makes the cookies rich.
- Salt
- All-purpose Flour
How to Make Thumbprint Cookies
Mixing the Dough
Begin by preheating the oven to 350°F and lining a baking sheet with parchment paper.
Place the butter in a large mixing bowl and make sure it's the correct consistency. You want it to be soft, but not melted or very oily. In a separate, smaller bowl, mix the granulated sugar with the vanilla bean paste.
Note: If you're using a whole vanilla bean, use a sharp-tipped knife (like a paring knife) and split it lengthwise down the center. Use the sharp edge of the knife to scrape the inside of the vanilla bean pod. There will be clusters of the vanilla beans on the knife. Rub those into the sugar until they're no longer clumpy.

Add the vanilla sugar and powdered sugar to the butter and mix until well-combined and slightly fluffy. This will take about 2 minutes with an electric hand mixer and 3-4 minutes by hand.
Next, stir in the egg yolk until it's completely mixed into the butter mixture.


Add the flour and salt to the bowl and mix until it's all worked into the dough. You don't want any stray streaks or clumps of flour, but you also don't want to over mix as that can make the cookies a bit tougher.
Baking the Cookies
Scoop the dough into 1 ½-2 tablespoon sized balls. This portion scoop makes the job super easy! Roll each scoop of cookie dough into a round ball (this makes them nice and smooth and helps prevent cracking edges).
Place them about 2-3" apart on the cookie sheet. They don't spread much when baking, so you can put them fairly close together.

Use a rounded teaspoon to press down into the center and create a well in each cookie. If you're filling the cookies with icing, leave the center empty.

If you're using jam (or another option like a fruit curd or nut spread), place some in the center of each cookie. Fill them generously, but don't over fill or it will spill out over the sides and create messy cookies.
Bake the cookie for 8-10 minutes, or until the edges are set. They won't really be golden brown except for perhaps the very bottom edge. But you don't want the cookie part to look at all doughy or wet.
If you left the centers unfilled, they may have puffed up during baking. Use the back of the teaspoon to press them down again. Now they're ready to fill with icing!
Remove the cookies to a cooling rack and allow them to cool completely before icing.
Making the Icing for the Cookies
In a small bowl, sift the 1 ½ cups powdered sugar to remove any lumps. Add ½ teaspoon vanilla bean paste and 2 tablespoons of milk. Stir until the powdered sugar has all been combined.

Add more milk as needed until the frosting is a good consistency. You don't want it to be thin, but it should not be dough-like. If the icing runs off of a spoon in a thick ribbon, it's a good viscosity.
Use a small spoon or piping bag to fill the center of each cookie. Allow them to sit flat for an hour or two so that the frosting has a chance to dry a bit and doesn't run off the edges.

After filling the cookies, add more milk, a tiny bit at a time, to the remaining icing until it is thin enough to drizzle.
Note: If you're filling your cookies with jam, and only using the icing for a drizzle, you may want to make a half batch of icing.
Thumbprint Cookies with Icing and Nuts
There are several variations you can create with this traditional thumbprint cookie. One popular option is to roll each cookie dough ball in finely chopped nuts before baking.
I used pecans here, and thought that the flavor and texture complimented the cookies nicely. However, you could use just about any nut--walnuts, almonds, or hazelnuts (which would be amazing with Nutella filling!) Just make sure they're chopped fairly fine.


After that, thumbprint, fill, and bake the cookies just like you would without nuts. The bake times won't be affected by the addition of the nuts.
Thumbprint Cookies with Icing and Sprinkles
Sprinkles are another great way to make the cookies a little more eye catching! You can add them two different ways. Either mix the sprinkle into the cookie dough, or sprinkle each ball in a small dish of sprinkles before thumbprinting, filling, and baking.


Recipe Notes, Tips, and FAQs
- If your dough is soft, you can chill it for 10-15 minutes after scooping it into balls. This helps the butter solidify, and prevents them from spreading too much in the oven.
- Make sure that the cookies are completely cooled before icing them. This prevents the frosting from melting and allows it to set beautifully.
- If you want to be very precise, use a piping bag or a small spoon to carefully fill the thumbprint well with icing. This ensures an even and aesthetically pleasing distribution.
- If you want a particular color scheme (red and green are great for Christmas), add a few drops of food coloring to your icing.
Yes, thumbprint cookies freeze very well. I would recommend freezing them in an airtight bag or container before adding any frosting.
When you're ready to eat them, remove them from the freezer and allow them to thaw. Then, fill or drizzle with frosting as needed.

Other Cookie & Candy Recipes That are Perfect for Holiday Gifting:
Suppose you need a few options for holiday gifting or a cookie exchange. In that case, you can also try Lemon Drop Cookies, White Chocolate Peppermint Cookies, Vanilla Sables, Birthday Cake Macarons, Hot Chocolate Cookies, or White Chocolate Macadamia Cookies. And if you're in more of a candy (read: chocolate) mood, Pecan Turtles are simple and always a huge hit!

Thumbprint Cookies with Icing
Ingredients
- ⅓ cup (66 g) granulated sugar
- 1 vanilla bean pod, scraped, or 2 tsp. vanilla bean paste
- 2 sticks (8 oz., 228 g) butter, salted or unsalted (see notes)
- ⅓ cup (40 g) powdered sugar
- 1 egg yolk
- ¼–½ tsp. salt (see notes)
- 2 cups (280 g) all-purpose flour
Instructions
Begin by preheating the oven to 350°F and lining a baking sheet with parchment paper.
Place the butter in a large mixing bowl and make sure it's the correct consistency. You want it to be soft, but not melted or very oily. In a separate, smaller bowl, mix the granulated sugar with the vanilla bean paste.
Note: If you're using a whole vanilla bean, use a sharp-tipped knife (like a paring knife) and split it lengthwise down the center. Use the sharp edge of the knife to scrape the inside of the vanilla bean pod. There will be clusters of the vanilla beans on the knife. Rub those into the sugar until they're no longer clumpy.
Add the vanilla sugar and powdered sugar to the butter and mix until well-combined and slightly fluffy. This will take about 2 minutes with an electric hand mixer and 3-4 minutes by hand.
Next, stir in the egg yolk until it's completely mixed into the butter mixture.
Add the flour and salt to the bowl and mix until it's all worked into the dough. You don't want any stray streaks or clumps of flour, but you also don't want to over mix as that can make the cookies a bit tougher.
Scoop the dough into 1 ½-2 tablespoon sized balls. This portion scoop makes the job super easy! Roll each scoop of cookie dough into a round ball (this makes them nice and smooth and helps prevent cracking edges).
Place them about 2-3" apart on the cookie sheet. They don't spread much when baking, so you can put them fairly close together.
Use a rounded teaspoon to press down into the center and create a well in each cookie. If you're filling the cookies with icing, leave the center empty.
If you're using jam (or another option like a fruit curd or nut spread), place some in the center of each cookie. Fill them generously, but don't over fill or it will spill out over the sides and create messy cookies.
Bake the cookie for 8-10 minutes, or until the edges are set. They won't really be golden brown except for perhaps the very bottom edge. But you don't want the cookie part to look at all doughy or wet.
If you left the centers unfilled, they may have puffed up during baking. Use the back of the teaspoon to press them down again. Now they're ready to fill with icing!
Remove the cookies to a cooling rack and allow them to cool completely before icing.
In a small bowl, sift the 1 ½ cups powdered sugar to remove any lumps. Add ½ teaspoon vanilla bean paste and 2 tablespoons of milk. Stir until the powdered sugar has all been combined.
Add more milk as needed until the frosting is a good consistency. You don't want it to be thin, but it should not be dough-like. If the icing runs off of a spoon in a thick ribbon, it's a good viscosity.
Use a small spoon or piping bag to fill the center of each cookie. Allow them to sit flat for an hour or two so that the frosting has a chance to dry a bit and doesn't run off the edges.
After filling the cookies, add more milk, a tiny bit at a time, to the remaining icing until it is thin enough to drizzle.
Note: If you're filling your cookies with jam, and only using the icing for a drizzle, you may want to make a half batch of icing.


These are the prettiest thumbprint cookies I've ever seen, and I cannot wait to make them with my kids. I know we're going to have a blast mixing and matching the fillings with our favorite jams.
Thank you for bringing these gorgeous cookies to our collaboration and participating in this year's exchange! I hope you and yours have a happy holiday season!
My mind is reeling from the sensory experience of consuming these things. *POW*. Just amazing.