Description
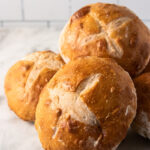
These homemade sourdough bread bowls are mini loaves of sourdough made to hold soups, stews, and chowders. Remove the centers of the crusty boules and create a delicious bowl. These can be made in about 8 hours or left for a longer overnight ferment, so they can fit into any schedule!
Ingredients
- 810 grams (6 cups) unbleached all-purpose flour
- 560 grams (2 1/3 cups) filtered water, room temperature
- 284 grams (about 1 1/4 cups) active, bubbling sourdough starter.
- 21 grams (3 1/2 teaspoons) salt
- 21 grams (1 Tablespoon) honey
Instructions
In a large mixing bowl, stir the active starter, water, and honey or sugar together. Add the flour and salt and combine until you have a rough, shaggy dough.
After thirty minutes to an hour, do a series of stretches and folds. Grab one side of the dough and slowly stretch it up, then fold it over. Turn the bowl a quarter turn and repeat the stretching/folding process 20-25 times.
Cover the bowl with a clean dish towel and set it aside for thirty to sixty minutes. This is called the autolyse and allows the flour to be thoroughly absorbed and for the gluten and flavor to begin developing in the dough.
Cover the dough again and let it rest for 30 more minutes, then do another set of 4-8 stretches and folds. Repeat this step one more time until you've done a total of three rounds of folds, including the first set of 20-25.
The dough is now ready for it's first rise.
Set the covered bowl of dough in a warm, draft free place. The ideal temperature is going to be 75°-82°F for optimal rising.
The first rise should take 4-6 hours, depending on the temperature of your proofing drawer or kitchen, or until the dough has increased by 50-75%.
Once the dough has finished it's first rise, turn the dough out onto the counter and divide it into 6 equal pieces. If you wish to bake the following day, place the dough in the refrigerator at this point
Use your baking scale to weigh the dough, then divide that by six. Mine were about 273 grams each.
Take each ball of dough, and flatten it out gently, making sure not to deflate all of the air from it. Fold it in thirds in one direction, then the other.
Turn over the dough so that the seams are down. Cup your hand around the dough, and pull it across the counter towards yourself. This stretches the gluten on the outer edge of the dough, creating a strong "cloak" around the bread bowl. Rub it well with flour.
Repeat this process with each of the pieces of dough. Place each of the shaped mini loaves in a small bowl lined with a well-floured tea towel.
Cover the dough with the edges of the towels to prevent it from drying out. Allow it to rise in a warm place for about another hour.
To bake the bread bowls, heat your oven to 450°F. Use the fan (or convection) setting if you have it to help the bread bowls bake more evenly.
If you have a baking stone, place it in the oven before preheating. If not, bake them on a large baking sheet, with several inches of space in between to allow give them room to grow.
In a bowl, beat an egg with a tablespoon of water until it's smooth. Turn the loaves out onto parchment paper and brush off any extra flour. Using a pastry brush, brush the outside of each bread bowl with the egg wash. This gives you a nice, deep color on the crust.
Note: You may have to bake the bread in batches, depending on the size of your oven and baking sheet or stone. If so, only turn out the number you can bake at a time. Leave the rest in their forms while you're baking the first batch.
then score the tops of each. Slide them onto the baking stone or place the baking sheet in the oven.
Bake the bread bowls for 18 minutes, then reduce the heat to 375°F. Bake them for another 15 minutes, or until the crust is a deep golden brown.
Allow the bread bowls to cool completely before cutting into them. The crumb is still cooking inside when they're still hot from the oven, so if you cut into them too soon the inside will be gummy and undercooked.
When you're ready to serve the bread bowls, cut off just the very top. Don't cut too far down into the bowl, or there won't be much space for soup inside.
After trimming off the top, use your fingers to pull out the centers of the bowl. Leave a bit of bread around the edges, but remove most of it.
Set the bread bowl on a plate and fill it with soup. You can serve it with the bread from the inside on the plate.
Notes
- The discrepancy in times listed (9-26 hours) is based on if you're baking the bread bowls on the same day you mix the dough. The longer time is for the overnight bulk rise option.
- Baking the Bread Bowls with Steam
Baking with steam is optional, but creates a crisp, sturdy crust that holds up better when there's soup inside. To create steam in your oven, place a rack in the center of it. Place another rack in the bottom of the oven and place a small metal pan (like a loaf pan) on one side of the oven.
Fill the pan at least half way with water and preheat the oven to 450°F. When you open the oven to put the bread in, add a cup of ice cubes to the pan immediately before closing the door.
The cold ice hitting the hot water in the pan will create steam in the oven. Close the door as quickly as possible to keep the steam in the oven.
The bread bowls will bake for the same amount of time with or without steam.
- Prep Time: 30 minutes (divided)
- Rising Times: 7-24 hours
- Cook Time: 1 1/2 hours
- Category: Breads
- Method: Baking, Fermentation
- Cuisine: Bread