Description
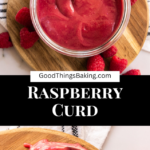
Raspberry Curd is a unique, pink alternative to the more traditional lemon curd. Top scones, fill tarts and muffins, or eat it by the spoonful–however you do it, just get it in your mouth!
Ingredients
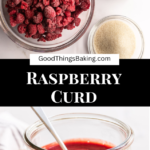
- 10 oz. raspberries, fresh or frozen
- 1/2 cup (100 grams) granulated sugar
- 1 teaspoon lemon zest
- 2 tablespoons lemon juice
- 5 egg yolks
- 1 whole egg
- A pinch of salt
- 4 tablespoons (56 grams) salted butter
Instructions
Place a fine mesh sieve over a clean, medium sized mixing bowl that is heatproof. Use metal or glass, not plastic.
Begin by placing your raspberries, sugar, salt, lemon zest, and lemon juice in a small pot. Heat them over medium low heat while stirring and smashing the berries for about 5-8 minutes. You want the berries to be soft and juicy, with no whole raspberries or pieces left. The mixture should look slightly jammy, but not thick.
Pour the cooked raspberry mixture into the sieve and press it through to the bowl. You want to move as much pulp and juice through to the bowl beneath without any seeds. Make sure to scrape the bottom of the sieve to get any juicy goodness from the bottom! Set it aside and let it cool.
Wash out the pot, and place about 2 inches of water in the bottom. Heat it over medium heat until it's steaming and bubbling.
While the water heats, beat the egg yolks and the whole egg until they're smooth. Slowly beat the eggs into the raspberries.
Put a clean sieve over another clean bowl and set it aside. This will be used to strain the finished curd and remove any bits of cooked egg white, leaving you with a silky smooth curd.
Place the bowl over the steaming water and reduce the heat to medium low. You want the water to stay nice and hot, but not be boiling.
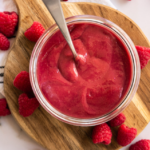
Stir the curd with a whisk while it cooks for 10-15 minutes. At first, it will just look juicy, but will slowly thicken up. Use a spoon to skim off any foam that develops on top.
Mine took right around twelve to reach the correct thickness, but it will vary based on the temperature, the thickness of your pot and bowl, etc. It should be thick enough to coat the back of a clean spoon when hot, and will thicken more as it cools.
When your curd is finished cooking, remove it from the heat and pour it through the sieve. Stir or gently tap the sieve on the edge of the bowl to encourage all of the curd through.
Add the butter while the curd is still warm, and stir until it's completely melted and mixed in. This will take a few minutes, but you don't want any streaks of butter showing in the curd.
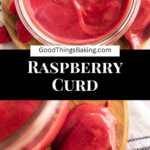
After the butter is completely mixed in, place the curd in an airtight container. Cover and store it in the refrigerator for up to 2 weeks.
Notes
- A Note on the Cooking Method: I've made this curd using a double boiler method, meaning that I cooked it in a bowl placed over a pot of boiling water. This way of cooking it gives you more control over how quickly the curd cooks and helps prevent it from curdling.
However, if you prefer, you can cook the raspberry curd directly in a pot, and it will turn out great. Plus you'll have fewer dishes to wash! Just be extra vigilant when cooking to not let it curdle or overcook.
- Allow all of your ingredients to come to room temperature before using them. Pull the eggs and butter out about 30 minutes before you start mixing your curd.
- Curd is best after it has chilled very thoroughly, since the texture will thicken and the flavors will deepen.
- Prep Time: 15
- Cook Time: 10